Booking your first horse riding lesson is exciting, slightly nerve-racking and the start of a sport that takes a lifetime to master. The good news: every confident rider you’ll ever meet started exactly where you are now. The best horse riding tips for beginners are not complicated — what to wear, how to greet the horse, how to sit, how to stop — and getting them right from your first lesson saves months of un-learning later.
This guide pulls together the practical advice that British Horse Society instructors, riding-school owners and lifelong riders agree on. It’s written for adults and older children booking lessons in the UK or South Africa for the first time, and it covers everything from kit and safety to grooming, mounting, position, the paces and what to expect at the end of your hour.
Table of Contents
What to Wear for Your First Lesson
The Three Non-Negotiables
Most riding schools will lend you a hat for your first lesson, but you still need to turn up dressed sensibly. The three things that matter most are:
- A riding hat — must meet the current BSI standard (PAS 015 or equivalent). The school’s hat is fine for a taster lesson, but buy your own once you commit.
- Boots with a small heel — the heel stops your foot sliding through the stirrup. Wellies, jodhpur boots or paddock boots all work. No trainers, takkies or sandals.
- Long, close-fitting trousers — jodhpurs, leggings or skinny jeans. Loose trousers ride up and bunch under your knee, which is sore.
Helpful Extras
- Half chaps or full chaps protect your calves from rubbing on the stirrup leathers
- A close-fitting fleece or jumper — riding warms you up surprisingly fast
- Gloves prevent rein burn, especially in cold weather
- A body protector if you’re nervous about falls (some schools provide them for jumping)
Avoid loose scarves, dangly jewellery and big watches — anything that can catch is best left at home.
Choose a Good Riding School
The single biggest factor in whether you enjoy riding is the riding school itself. In the UK, look for a yard approved by the British Horse Society (BHS) or by the Association of British Riding Schools (ABRS). Both organisations inspect for horse welfare, instructor qualifications and safety standards. In South Africa, look for a school registered with the South African National Equestrian Federation (SANEF) or one with EFI-recognised instructors.
Visit before you book. Watch a lesson. The horses should look relaxed and well-fed, the yard should be tidy, and the instructor should be calm and clear. If the staff are short with the horses or each other, walk away.
Meeting and Greeting the Horse
Approach Calmly and from the Side
Horses have a blind spot directly in front of their nose and directly behind their tail. Always approach from the side, ideally the left (the near side), where most horses are used to being handled. Speak as you approach so they hear you coming — a sudden hand on the shoulder of a snoozing horse is a startling thing.
Offer the back of your hand for the horse to sniff — experienced riders call this the “horseman’s handshake.” Stroke the neck or shoulder rather than the face: horses tolerate face touching from people they know, but it’s a more intimate area than it looks.
Read the Body Language
A relaxed horse has soft eyes, a soft mouth, ears that swivel gently and one hind leg cocked. Pinned ears, a swishing tail or a stamping foot mean the horse is irritated — give it space. Confident horsemanship starts with reading the horse before you touch it.
Grooming and Tacking Up
Riding rarely starts in the saddle. At most schools the lesson begins on the ground, grooming and tacking up — and it’s the fastest way to build a bond with the horse before you climb aboard. Don’t treat it as a chore; it’s where you learn to handle the horse calmly and spot anything amiss.
- Grooming — a quick brush-over removes dirt and grit that would otherwise rub under the saddle and girth. It also lets you check for cuts, heat or swelling before work.
- Picking out feet — lifting each hoof and clearing out stones with a hoof pick is a basic skill your instructor will demonstrate. Stand to the side, never directly in front of or behind the leg.
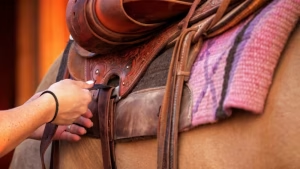
- Tacking up — the instructor will usually fit the saddle and bridle for a first-timer, but watch closely. The girth should be firm but not yanked, and the numnah or saddle pad should sit smoothly with no wrinkles.
For a full walk-through of bridle, bit and saddle, see our guide to tacking up a horse. Knowing your kit makes you a safer, more independent rider far sooner.
How to Mount Correctly
Most horses are mounted from the left side, a tradition dating back to cavalry days when the rider’s sword hung on the left. Use a mounting block whenever one is available — it’s far kinder to the horse’s back and saddle than swinging up from the ground.
- Stand on the block beside the horse’s left shoulder
- Hold both reins in your left hand at the withers, with a small handful of mane to steady yourself
- Place your left foot in the stirrup, ball of foot on the iron, knee bent
- Push up off the right leg, swing your right leg over the horse’s hindquarters smoothly (not over the back)
- Lower yourself gently into the saddle — don’t drop
- Find your right stirrup and check both leathers are even
If you’re working on your position from day one, mounting smoothly is the first place it shows.
The Correct Riding Position
The Vertical Line
The classical position lines up four points: ear, shoulder, hip and heel. Drop a plumb line from your ear and it should pass through your shoulder, your hip socket and the back of your heel. This vertical alignment keeps you balanced over the horse’s centre of gravity, so you stay with the movement instead of behind it or in front of it.
From Top to Bottom
- Eyes — looking ahead between the horse’s ears, not down at its neck
- Shoulders — relaxed, back and down (not hunched)
- Elbows — bent, soft, hanging close to your sides
- Hands — held just above the withers, knuckles vertical, like holding two ice-cream cones
- Seat — sitting on your three-point seat (two seat bones and the front of your pelvis), not slouched on your tailbone
- Legs — long and draped against the horse’s sides, knee soft, calf in light contact
- Heels — lower than your toes, weight dropping down through the stirrup
The most common beginner fault is gripping with the knees. Don’t. Gripping makes you tense, lifts your seat out of the saddle and squeezes you upwards — the opposite of what you want.
Learn the Two-Point Position
Ask any experienced rider for the one thing they wish they’d practised sooner and a surprising number say the same thing: the two-point position. Also called “light seat” or jumping position, it means folding forward from the hip and lifting your seat just out of the saddle, taking your weight down into your heels and through the stirrups while your lower leg stays still.
It feels wobbly at first, but it teaches the single most important skill in riding — balance independent of the reins. Once you can hold a light seat in walk and trot without grabbing the mouth or tipping forward, everything else gets easier: rising trot, cantering, and eventually popping over a small fence. Ask your instructor to let you try it in walk early on; a few minutes each lesson pays off fast.
Using the Reins, Legs and Voice
The signals you give the horse are called the aids — a combination of rein, leg, seat and voice that together tell the horse what you want.
Reins Communicate, They Don’t Steer the Car
Hold the reins with a light, closed fist. Imagine you’re holding a small bird. Tight enough not to drop it, soft enough not to hurt it. The reins are not a steering wheel and not a brake; they’re a phone line between your hand and the horse’s mouth.
To turn, think of opening a door: gently move your inside hand a few centimetres out in the direction you want to go, and support with a touch of leg on the outside. To slow, close your fingers and sit a little taller — don’t haul backwards. To stop, sit deep, close both legs (yes, legs) to bring the hindquarters under, and gently close the rein. A more advanced version of this, the half-halt, is something you’ll meet once you’re balanced and rebalancing the horse yourself.
Leg Pressure Drives the Horse
To ask the horse to walk on, squeeze with both calves — don’t kick. If nothing happens, ask again slightly stronger. Your instructor may add a tap with a schooling whip behind the leg, but the principle is always: ask softly first, then a little firmer if there’s no response, then reward the moment the horse responds by softening.
Voice Aids Are Allowed
Most school horses know voice cues. A clear “walk on” or a quiet “whoa” reinforces your other aids. In dressage tests voice aids are penalised, but in lessons they’re a perfectly good way to learn the timing.
Walk, Trot and Canter Basics
| Pace | Beat | Approx speed | What you do as the rider |
|---|---|---|---|
| Walk | Four-beat | 4 mph / 6 kph | Sit deep, follow with your seat and elbows |
| Trot | Two-beat | 8 mph / 13 kph | Rise (post) up and down with the outside diagonal |
| Canter | Three-beat | 12 mph / 19 kph | Sit deep, swing your hips with the rocking motion |
The first big skill you’ll learn is rising trot (Britain) or posting trot (older American books) — standing slightly in your stirrups every other stride to absorb the bounce. It feels awkward for the first few minutes, then it clicks. A patient school horse and a good instructor get most people there inside a single lesson. The two-point position you practised earlier is what makes rising trot fall into place so quickly.
Stay Relaxed and Breathe
Horses are prey animals. They read tension faster than you can hide it — held breath, locked jaw, white knuckles all transmit straight down the reins. The biggest jump in confidence most beginners make is the moment they realise the horse is not trying to throw them off; it’s a school horse doing the same thing it does five times a day.
If you feel yourself tensing, breathe out long and slow, drop your shoulders, and talk to the horse. Voice is one of the strongest aids you have for calming both you and the horse.
Dismounting and After the Ride
- Bring the horse to a halt and wait for your instructor’s nod
- Take both feet out of the stirrups
- Hold the reins and a handful of mane in your left hand
- Lean forward slightly, swing your right leg cleanly over the hindquarters
- Lower yourself down on your stomach against the saddle, then slide gently to the ground
- Land bending at the knees — never jump down from height
Once on the ground, run the stirrup irons up the leathers, pat the horse, and lead it back to the yard. Most schools will let — or expect — you to help untack and brush off the horse. It’s good etiquette and good learning.
Common Beginner Mistakes (and How to Fix Them)
- Looking down — your weight follows your eyes. Look up between the horse’s ears, not at its neck
- Hands in the air — beginners often lift their hands hoping it helps their balance. It doesn’t; keep your hands low, at hip level, with a light, even contact
- Gripping the reins for balance — hold the mane, the front of the saddle (the grab strap) or your jacket — never the horse’s mouth
- Hunching the shoulders — sing or chat to the instructor; you can’t hunch and breathe out at the same time
- Toes pointing down — usually because the stirrups are too long. Ask for them to be shortened
- Going too fast too soon — there is no rush. A confident walk and trot is worth ten cantered laps with bad position
Hacking and Trail Riding
Once you’re confident in walk and trot in the school, the next step is usually a “hack” — a ride out into countryside or, in South Africa, the bush or veld. Hacks are gloriously different from arena work: changing surfaces, wildlife, traffic noise and uneven ground all keep you and the horse honest.
- Stay alert — birds bursting out of hedgerows, plastic bags blowing across paths and dogs all spook horses
- Keep at least one horse-length between you and the rider in front (a kicking horse can reach further than you’d think)
- On UK roads, ride single file in heavy traffic and thank drivers who slow down — a wave goes a long way
- Always tell someone where you’re going and when you’ll be back
What to Expect from Your First Lesson
A typical first hour at a UK riding school looks like this:
- Arrive 15 minutes early. Get fitted for a hat, change into your boots, sign a disclaimer.
- Meet your horse in the stable or yard. The instructor will introduce you and check your tack is on correctly.
- Walk to the indoor or outdoor school. Mount from a block, settle in the saddle, check stirrup length.
- 10–15 minutes of position work in walk — feet, hands, shoulders, eyes.
- Walk and a little rising trot on the lunge or independently, depending on confidence.
- A short cool-down on a long rein.
- Dismount, run up stirrups, pat the horse, help untack if invited.
UK group lessons typically cost £35–£55, private lessons £45–£75, with London and the south generally pricier than the north. South African lessons range R250–R450 for an hour. Block-booking five or ten lessons usually takes a chunk off the price.
Don’t expect to canter in your first lesson. Don’t expect to feel elegant. Do expect to feel sore in places you didn’t know you had — the “second-day stiff” after a first ride is universal and goes away after three or four lessons. The benefits of horse riding, from core strength to mental health, kick in surprisingly fast.
Frequently Asked Questions
What is the best age to start horse riding?
Children can start lead-rein lessons from about four years old, although most riding schools begin formal lessons at six or seven. There is no upper limit — riding schools regularly take complete beginners in their fifties, sixties and seventies. The right age is whenever you feel ready and the school is happy to accept you.
How long does it take to learn to ride a horse?
You can sit in walk and rising trot in a handful of lessons. A confident, balanced position in walk, trot and canter typically takes six to twelve months of weekly lessons. Becoming a competent independent rider — schooling, jumping small fences, hacking out alone — usually takes two to three years.
Is horse riding hard for beginners?
It’s harder than it looks and easier than people fear. The physical demands surprise most beginners — riding works your core, inner thighs and posture muscles. The mental side, learning to communicate with a half-tonne animal, is what makes it a sport for life rather than a one-afternoon experience.
What is the 20% rule in horse riding?
The 20% rule is a guideline that a rider’s combined weight (rider plus tack) should not exceed roughly 20% of the horse’s body weight, to protect the horse’s back. Most riding schools match horse to rider before you book, but it’s worth knowing — and worth being honest with the school about your weight when booking.
Do I need my own riding helmet for my first lesson?
No. Every reputable riding school provides a fitted helmet for first-time riders. Once you commit to lessons, your own helmet is the first piece of kit to buy — it should be PAS 015 (UK) or equivalent and properly fitted by a trained retailer. A helmet that has taken any impact must be replaced.
Will I fall off in my first lesson?
Probably not. School horses used for beginners are chosen for their patience, and first lessons are conducted in walk and a little trot, often on the lunge with the instructor in close control. Falls do happen as you progress to faster work and jumping, but for a first lesson, the odds are firmly on your side.