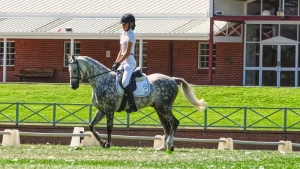
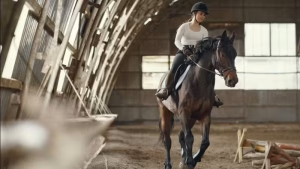
Getting your horse on the bit is one of the most misunderstood goals in flatwork. It is not about pulling the head down, hauling on the reins, or holding the horse in an “outline”. A horse is genuinely on the bit when he is working from a calm, active hindleg, swinging through the back, and seeking a steady contact forward into the rider’s hand — with the result that the head settles roughly on the vertical, of his own accord. Get the back-to-front sequence wrong and you end up with a horse that looks tucked in but is going nowhere. Get it right and the work transforms.
Table of Contents
What “On the Bit” Actually Means
The classical definition, set out in the FEI dressage rules and unchanged in essence for two hundred years, is this: a horse is on the bit when he accepts the contact softly, carries his head with the front of the face on or just in front of the vertical, and is connected from the engaged hindleg through a swinging back into the rider’s hand. The poll is the highest point of the neck. The mouth is quietly closed and softly chewing the bit.
What it is not:
- A head-down position produced by pulling on the reins
- A “frame” achieved with draw reins, side reins, or any other gadget
- A short, tight neck with the head behind the vertical (overbent)
- An ornament added to the front of a horse who is otherwise dragging himself along on the forehand
This distinction matters. A horse who is genuinely on the bit is more rideable, lighter in the hand, and physically capable of more advanced work. A horse who is held in a false outline by the rider’s hands is a horse going backwards in his training — even if he wins novice dressage classes by looking the part.
Why It Has to Be Back-to-Front
Every classical training system in the world — German, French, Iberian, British — agrees on this single point: the contact comes from the back, not the front. The hindleg steps under the body, the back lifts and swings, the energy travels forward through the neck, and the horse seeks a contact with the bit because he needs somewhere to put that energy. The rider’s hand receives the contact; it does not create it.
This is why pulling on the reins to “get the head down” produces such poor results. You can shorten a horse’s neck with strong hands, but you cannot create the through-the-back connection that defines genuine work on the bit. The horse hollows, drops the back, drags the hindlegs, and develops the muscles that resist contact rather than the muscles that carry it. Six months of this and you have a horse with an upside-down topline, a thick underneck, and a permanent suspicion of the rein.
The correct sequence — leg first, seat next, hand last — runs counter to most riders’ instinct. When the horse pokes his nose out, the natural reaction is to pull. The trained reaction is to push: more inside leg into outside rein, recreate the contact from behind, accept that the head will only come down when the connection is right.
Prerequisites Before You Start
You cannot ride a horse onto the bit if any of the following are true:
- The saddle pinches. Get it checked by a qualified saddle fitter every six months minimum, and any time the horse changes shape.
- The teeth are unbalanced. Sharp edges, hooks, or a wave mouth make a steady contact impossible. Annual dental checks are not optional.
- The bit doesn’t fit. Wrong width, wrong mouthpiece, or wrong noseband-bit interaction will block the contact. See our guide to fitting a bit.
- The horse is in pain. Gastric ulcers, kissing spines, hock or back pain — all show up as resistance to contact long before they are formally diagnosed.
- The rider’s position is unstable. A rider who balances on the reins cannot give the steady, elastic contact the horse needs. Work on your riding position in parallel.
- Forwardness is missing. A horse behind the leg cannot be connected. Establish honest forward response to a light leg before anything else.
If any of these are off, address them first. Trying to ride a horse onto the bit through pain or with the wrong tack is the single most common cause of resistance, evasion, and ultimately a horse that hates flatwork.
Step-by-Step: How to Get Your Horse on the Bit
Step 1: Establish a forward, marching walk
Walk the horse on a long rein for five minutes. Then take a working contact — feel of the mouth, no pulling — and ride a positive, marching walk with clear hindleg activity. The walk is honest: if the horse is dull behind the leg, working trot won’t fix it.
Step 2: Ride forward into a soft, even contact
Pick up working trot. The reins should be just short enough that you can feel the bit when the horse moves his head. The contact is even on both sides, light, and elastic — like holding a child’s hand in a busy street. Not heavy. Not loose.
Step 3: Use inside leg to outside rein
This is the building block of all dressage. As you ride a 20-metre circle, use your inside leg to push the horse outwards into your outside rein. The outside rein receives the energy. The inside rein stays soft, almost decorative — its only job is to maintain a hint of inside flexion. Most riders use far too much inside rein, which blocks the very energy they’re trying to create.
Step 4: Half-halt to balance
A half-halt is a momentary, simultaneous engagement of seat, leg, and rein that says: “rebalance, lift the back, stay with me”. It is not a pull. It is not a hand action alone. Apply for one stride, release immediately. Repeat as needed. Half-halts are the punctuation of dressage — without them, the work is one long unintelligible sentence.
Step 5: Wait for the horse to seek the bit
Done correctly, the above will eventually produce a moment — sometimes after thirty seconds, sometimes after thirty minutes — where the horse softens through his neck, lowers his head a fraction, and reaches for the contact. Reward instantly: a slight forward of the hand, a kind word, a brief stretch on a long rein. That is the moment of genuine connection. It is the moment you build on.
Step 6: Build duration
Initially you may only get one or two strides of true contact at a time. That is fine. Aim for short periods of correct work followed by short periods of stretching. Over weeks and months, the periods of correct work lengthen, and the horse begins to offer the contact rather than waiting for the rider to find it.
Exercises That Build a Genuine Contact
Transitions, transitions, transitions
Walk-trot-walk, trot-canter-trot, and within-pace transitions (working trot to medium trot to working trot) are the single most effective tool for building a connection. Every transition asks the horse to engage the hindleg and rebalance — exactly the mechanics that produce genuine on-the-bit work. Aim for ten or more transitions per session, ridden with absolute precision.
Spiral in, spiral out
On a 20-metre circle, gradually spiral inwards to a 10-metre circle over four or five revolutions, then spiral back out using inside leg into outside rein. The spiraling out exercise in particular develops genuine outside-rein connection and lateral suppleness simultaneously.
Leg-yield on the long side
From the three-quarter line, leg-yield to the track. Done correctly, the horse must accept the outside rein and step under with the inside hindleg — both contact-building mechanics. See our guide to leg yield for the technique.
Stretching circle
On a 20-metre circle, gradually allow the rein out, encouraging the horse to follow the contact down and out into a long, low stretch. Done correctly the horse maintains the same rhythm, the same connection, but with a longer neck. This is the test that proves the contact is genuine — a horse held in a false outline cannot stretch.
Pole work
A simple line of three trotting poles encourages the horse to lower the head, swing through the back, and engage the hindleg automatically. Many horses come on the bit for the first time over poles. See our piece on pole exercises.
Common Mistakes to Avoid
- Sawing or see-sawing the reins. Alternately pulling on each rein to “soften” the horse. It produces a wobbly false outline and damages the mouth. Stop.
- Riding with shortened reins and no leg. Holding the head in without driving from behind. The horse hollows, drops the back, and learns to evade.
- Using gadgets as a shortcut. Draw reins, market harboroughs, and chambons all force a head position without building the connection. They are tools for advanced trainers diagnosing a specific problem, not for everyday riding by amateurs. See our piece on the chambon for context.
- Rewarding nothing. If you never give a forward of the hand or a stretch break, the horse has no reason to seek the contact.
- Rushing. Genuine connection takes weeks or months to build. Riders who demand it in one session usually get a fake version that disappears the moment the horse is challenged.
- Ignoring rhythm. A horse without a steady rhythm cannot maintain a steady contact. Fix the rhythm first.
False Outlines and How to Spot Them
A false outline mimics the appearance of correct work without any of the mechanics. Tell-tale signs:
- Behind the vertical. The horse’s nose is tucked towards his chest. He is not on the bit — he is overbent and avoiding the contact.
- Thickened underneck. Look at the horse from the side. A correctly worked horse has a smooth, slightly arched topline. A horse held in a false outline develops a bulging muscle on the underside of the neck (the brachiocephalicus) — a clear sign of pulling against the contact.
- Tail clamped or swishing. Tension in the tail almost always indicates tension in the back.
- Hindlegs trailing. Watch from behind or ask someone to watch from the ground. If the hindlegs aren’t tracking up to or beyond the front hoofprints, the connection isn’t real.
- Cannot stretch. Offer the rein on a circle. A correctly worked horse will follow the bit down and out. A horse in a false outline lifts the head or runs.
Troubleshooting by Horse Type
The strong horse
Heavy in the hand, leans on the bit, ignores half-halts. Solution: more transitions, more half-halts, more lateral work. Stop pulling against him — every time you do, you confirm the contact he wants. Use lots of changes of direction and within-pace transitions to keep him guessing and balanced on his hindleg.
The hot, behind-the-leg horse
Tense, rushes, hollows away from contact. Solution: forward and slow. Establish a marching walk first, then a steady trot in stretching frame. Don’t ask for collection until the horse trusts the contact in stretch. Lots of long, low work over poles and big circles.
The young or green horse
Doesn’t know what contact is yet. Solution: weeks of stretching work, lots of walk on contact, gradual introduction of transitions. Forget about “outline” entirely for the first six months under saddle. The connection comes through correct work, not through demanding a shape.
The hollow, ewe-necked horse
Conformationally challenging — typically older horses ridden incorrectly for years. Solution: long, slow work in stretch, building the topline gradually with transitions and pole work. Months of correct work to undo years of incorrect work. There is no shortcut.
The horse that goes behind the bit
Tucks the chin, drops the contact. Solution: leg, leg, leg. Forward — and a longer, more positive rein — until the horse seeks the bit again. Never pull a behind-the-bit horse forward; ride him there with seat and leg.
From Working Outline to Collection
Being on the bit is the first stage of a journey, not a destination. The classical training scale moves through:
- Rhythm — even, regular footfalls in all paces
- Suppleness — relaxation through the back and joints
- Contact — the steady, elastic connection we have been describing
- Impulsion — controlled forward energy from the hindleg
- Straightness — equal use of both sides of the body
- Collection — the engaged, uphill carriage of advanced dressage
Genuine on-the-bit work sits at stage three. You cannot reach stages four through six without it. Riders who skip the foundations and try to “collect” a horse who isn’t yet supple and connected end up with the lateral movements done with stiff backs and trailing hindlegs — the kind of riding that gets six-marks at novice level and then plateaus forever.
Final Thoughts
Getting your horse on the bit is the slow accumulation of small, correct moments — not a trick to be pulled off in a single session. Ride forward, ride into the contact, half-halt to rebalance, and reward the moment your horse softens. Get the foundations right (sound horse, fitting tack, balanced rider, honest forwardness) and the connection follows. Skip them and you are building on sand.
For more on developing flatwork, see our pieces on dressage basics, the extended trot, and counter canter.
Frequently Asked Questions
How long does it take to get a horse on the bit?
Genuinely connected work takes weeks to months of correct riding, depending on the horse and rider. Brief moments can come quickly; sustained, reliable contact takes patience. Anyone promising a “head down in one session” is selling a false outline.
Should I use draw reins to get my horse on the bit?
No — not as a default tool. Draw reins force a head position without building the back-to-front connection. They are occasionally useful in skilled hands for diagnosing a specific problem, but for amateur riders trying to establish a contact, they cause more problems than they solve.
Why does my horse keep coming above the bit?
Common causes: rider too quick to use rein, horse behind the leg, pain (back, teeth, ulcers), wrong bit, unstable rider position. Address each in turn — the answer is rarely “more contact” and almost never “stronger bit”.
What is the difference between on the bit and on the forehand?
On the bit means a connected, balanced horse working from the hindleg with a soft contact. On the forehand means the horse is heavy on his front legs, leaning on the bit, with the hindleg trailing — the opposite of correct work. A horse can have his head on the vertical and still be entirely on the forehand.
Can a young horse work on the bit?
A young horse should not be asked to work in a fixed outline at all in the first six months under saddle. Focus on rhythm, balance, and forwardness in a stretching frame first. Genuine on-the-bit work develops naturally as the horse builds strength and topline — usually from the second year of correct training onwards.