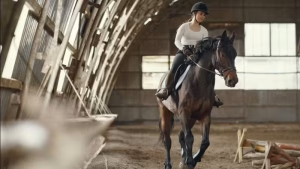
The correct horse riding position — head up, shoulders open, hips beneath the body, leg long with heel down, hands quiet — is the foundation of every other riding skill. Get it wrong and the horse can’t tell you anything; get it right and the lightest aids carry through. The classical “shoulder-hip-heel” alignment is not a stylistic preference but a biomechanical necessity: it puts the rider’s weight directly over the horse’s centre of balance and frees the legs and hands to give clear, independent aids. This guide breaks the position down piece by piece, with practical tips for fixing the faults most riders carry without realising.
Table of Contents
Why Riding Position Matters
A horse can carry an object on his back. He cannot carry a partner on his back unless that partner is balanced. The difference is visible to anyone who has watched a beginner sit a working trot — the rider bumps and tips, the horse hollows and braces, the work falls apart. Replace the rider with a balanced one and the same horse softens through his back and finds rhythm. Nothing about the horse changed.
The correct position does three things at once:
- It puts the rider’s weight where the horse can carry it most efficiently — directly over the horse’s centre of balance, just behind the withers.
- It allows the rider’s legs and hands to act independently of his seat. A rider who balances on the reins or grips with the knees has neither — every leg aid pulls the hands, every rein aid disturbs the seat.
- It absorbs the horse’s movement through the body’s natural shock absorbers (ankle, knee, hip, lower back) rather than slamming through a stiff frame.
For these reasons, every classical school of riding — German, French, Iberian, Vienna’s Spanish Riding School — teaches essentially the same position. The styles differ in detail; the fundamentals are identical.
The Classical Shoulder-Hip-Heel Alignment
The reference position used by all classical schools is the straight line dropped from the rider’s ear, through the shoulder, through the point of the hip, to the back of the heel. This is the “shoulder-hip-heel” alignment, and it is the diagnostic that any instructor will check first.
Sit on a chair with both feet flat on the floor and your weight distributed between your seat bones. Now imagine your stirrups dropping vertically beneath you. Your heel should be directly under your hip. Your shoulder should be open and stacked above your hip. Your head should sit lightly on top of your shoulders, looking forward. That is the saddle position, transferred to a chair.
Where this alignment breaks — and it breaks in most amateur riders — the consequences cascade. A heel that creeps forward (the “chair seat”) tips the pelvis backwards, hollows the lower back, and forces the rider to use the reins for balance. A heel that creeps backwards (the “fork seat”) tips the rider onto the pubic bone, closes the hip, and makes any half-halt impossible. Get the alignment right first; everything else builds from there.
Correct Position from Head to Heel
Head and eyes
Head balanced lightly on top of the spine, looking straight ahead at the horizon. Eyes up — riders who look down lose their balance forwards and shorten their reins inadvertently. The single most effective correction in any beginner lesson is “look up”. A rider who looks where she’s going rides where she’s looking.
Shoulders
Open and slightly back, but soft — not military stiffness. Shoulder blades flat against the back, chest open. The instructor’s image: “imagine carrying a small tray of glasses on your collarbone.” Closed shoulders pull the upper body forward and dump weight onto the horse’s forehand.
Upper arm and elbow
Elbow hanging naturally beside the body, not pinned to the ribs and not flapping outwards. There should be a soft bend at the elbow — straight arms create a fixed, unyielding contact; over-bent arms throw the contact away.
Hands
Carried just above and in front of the withers, thumbs uppermost, knuckles facing forward. Imagine carrying a glass of water in each hand — the wrist stays straight, the hand stays soft. There should be a straight line from the rider’s elbow, through the wrist, down the rein, to the horse’s mouth. Hands work together as a pair, not independently.
Torso and back
Tall, with the natural lumbar curve preserved. Not arched (a hollow back blocks the seat), not slumped (a rounded back collapses the chest and tips the rider forwards). The classical instruction: “grow tall through the crown of your head.” A long, supple spine absorbs movement; a stiff one transmits it to the horse’s back.
Hips and seat
Hips square to the front (in straight work) or to the inside of the bend (on a circle). Seat bones evenly weighted. The pelvis should be in neutral — neither tipped forward nor back. A tipped pelvis is the single most common source of position problems in adult riders, particularly those returning to riding after years away.
Thigh and knee
Thigh long and turned in from the hip socket, knee soft and flexible. The thigh should rest against the saddle without gripping. A gripping knee acts like a pivot — the lower leg swings forward and backwards uncontrollably. Open the hips, lengthen the thigh, and the lower leg settles.
Lower leg and ankle
Calf softly in contact with the horse’s side, just behind the girth. Ankle relaxed, allowing the heel to drop naturally as weight settles into the foot. The heel is not “pushed down” by force — that locks the ankle and makes the leg ineffective. The heel sits below the toe because the rider’s weight has flowed naturally through a relaxed leg.
Foot
Ball of the foot on the stirrup, with the iron at right angles to the horse. Toe pointing forward (a slight outward rotation is anatomically natural for most riders; a severe outward turn indicates a tight hip). Weight in the heel, not on the toe.
Position in Walk, Trot, Canter and Gallop
Walk
The fundamental position with no significant variation. Hips follow the four-beat movement softly; rider stays relaxed, seat in the saddle, hands following the natural nodding of the horse’s head. The walk is where you build feel — sit it well and the trot and canter follow.
Sitting trot
Same alignment, but the rider must absorb the two-beat movement entirely through the lower back, hips, and seat. Stiff riders bounce; supple riders glue. The single most useful image: “let the saddle come to you” rather than pushing into the saddle. Beginners benefit from short bursts of sitting trot rather than long ones — quality over duration.
Rising (posting) trot
The rider rises out of the saddle on one diagonal stride and sits on the other. The mechanical motion: tip the pelvis slightly forwards on the rise, return to neutral on the sit. The classical instruction is to “rise on the outside diagonal” — that is, the rise coincides with the outside front leg moving forward. This frees the inside hindleg to step under and engage. See our piece on horse trotting for more.
Canter
Three-beat pace. The rider’s hips follow the rolling motion forwards-and-back, never side-to-side. The seat stays in the saddle (a rider who pops out of the saddle in canter has lost the seat and is balancing on the reins). Outside leg behind the girth, inside leg at the girth. Shoulders square or very slightly to the inside of the bend.
Gallop and cross-country
Stirrups shorter, weight forward in two-point or “light seat” — seat just out of the saddle, weight in the stirrup, body parallel with the horse’s neck. This frees the horse’s back to gallop and is essential for any work at speed. Different from the dressage seat, but built on the same foundations.
The Jumping Position
The jumping or “forward seat” was developed by Federico Caprilli at the start of the 20th century and remains the standard for all jumping disciplines. The key principles:
- Stirrups shorter than dressage length — typically two to three holes shorter
- Weight in the heel, with the leg secure on the horse’s side
- Seat slightly out of the saddle on approach (light seat), folded forwards over the fence
- Hands following the horse’s mouth over the jump in the “automatic release” — never pulling back, never snatching
- Eyes up, looking to the next fence well before landing
The fold over the fence comes from the hip joint, not the waist. A rider who breaks at the waist throws her shoulders forward and pivots on the knee — the resulting position is unstable and interferes with the horse. A rider who folds from the hip stays balanced with the horse, gives him the freedom of his neck, and lands soft.
Common Position Faults and How to Fix Them
The chair seat
Symptom: Lower leg swings forward, weight tips back, rider braces against the stirrup. Cause: Stirrups too short, tight hip flexors, or the rider’s instinctive response to feeling unbalanced. Fix: Drop stirrups two holes, focus on lengthening through the front of the hip, ride without stirrups for short periods.
The fork seat
Symptom: Rider sits on the pubic bone rather than the seat bones, lower back hollow, lower leg drifts back. Cause: Tight pelvis, instinct to lean forward. Fix: Conscious focus on tucking the tailbone slightly under, lengthening through the back of the hip.
Round shoulders and collapsed chest
Symptom: Slumped upper body, hands held too low. Cause: Office posture carried into the saddle. Fix: Off-horse work on shoulder mobility — rowing exercises, doorway pec stretches, conscious “sit tall” through every transition.
Looking down
Symptom: Eyes drop to the horse’s neck or the ground. Cause: Lack of confidence, over-focus on hand position. Fix: Constant verbal cue to look up. Pick a marker at the end of the school and ride towards it; pick the next as you pass each one.
Gripping knees
Symptom: Lower leg swings, knees pinch, thigh stays clamped against the saddle. Cause: Insecurity in the seat, often masking a deeper balance problem. Fix: Conscious release of the knee at the top of every rising trot stride, lots of work without stirrups.
Stiff lower back
Symptom: Bouncing in sitting trot, rider unable to follow the horse’s movement. Cause: Tension, lack of core strength, or both. Fix: Pilates, yoga, conscious relaxation. The seat absorbs movement through the small joints of the lower spine — if those are locked, nothing works.
Exercises to Build a Better Seat
Riding without stirrups
The single most effective exercise for building a deep, secure seat. Start with five minutes per session in walk, then trot. The rider learns to absorb movement through the seat itself rather than relying on the stirrup for balance. Keep the lessons short and frequent — fatigue produces bad habits.
Lunge lessons
An experienced instructor lunges the horse while the rider focuses entirely on her own position — no reins, no stirrups, no responsibility for steering or pace. The most concentrated way to fix position issues. Worth its weight in gold for any rider serious about improvement.
Two-point in walk and trot
Holding the jumping (light) seat for several minutes builds the leg strength required for a secure, independent position in jumping and cross-country. Start short, build duration.
Conscious breath work
Tense riders hold their breath. Set a timer for one breath every four strides — a slow exhale through the nose. Sounds trivial. Transforms the seat.
Mirror or video work
What you feel and what you do are rarely the same. A friend with a phone in slow-motion mode for ten minutes per week catches habits no instructor’s words can describe. Watch the footage. Pick one fault. Work on it until the next video.
Rider Fitness and Flexibility
The classical seat asks for hip mobility, core strength, shoulder openness, and ankle flexibility — none of which are built in the saddle. Off-horse work makes a measurable difference in two to three months of consistent practice:
- Pilates — core and pelvic stability, the foundations of an independent seat
- Yoga — hip mobility, hamstring length, breathing
- Walking — most effective single thing a sedentary rider can do
- Squat work — leg strength and hip mobility under load
- Foam-rolling the IT band and hip flexors — most riders are tight in both
None of this is glamorous. All of it works. A rider with a strong core and supple hips will improve faster in the saddle than one without — there is no shortcut around the body’s mechanical limits.
Tack, Stirrup Length and Saddle Fit
Many position problems are tack problems in disguise. Before assuming the rider is at fault, check:
- Saddle fit for the rider. A saddle that is too small forces a forward seat; too large allows the rider to slip backwards. The seat size should accommodate the rider with about a hand’s breadth of room behind the seat bones.
- Saddle balance. A saddle that tips forwards (low at the pommel) puts the rider into a fork seat; one that tips backwards forces a chair seat. A saddle fitter can level the seat with judicious flocking.
- Stirrup length. For dressage, the stirrup leather should hang to the rider’s anklebone when the leg is dangling out of the iron. For jumping, two to three holes shorter. Most amateur riders ride too short for dressage and too long for jumping.
- Stirrup style. Flexible-arm safety stirrups reduce knee and hip strain in older riders. Heavier stirrups (e.g. composite or weighted irons) help with foot security.
A saddle fit consultation every six to twelve months is one of the highest-value things a serious rider can do. It catches small problems before they become postural ones.
Final Thoughts
The correct riding position is the work of a lifetime, not a checklist to tick once. Every rider — beginner, professional, or somewhere in between — has position habits to refine. Focus on the alignment first (shoulder-hip-heel), then on the small things (eyes up, soft elbows, breathing), then on the off-horse fitness that makes the in-saddle work possible. Get the foundations right and the horse will tell you immediately — he becomes lighter, more responsive, more willing.
For more on schooling and rider development, see our pieces on the benefits of horse riding, dressage training, horse riding for beginners, and how to get your horse on the bit.
Frequently Asked Questions
What is the correct riding position?
The classical position is a straight line from the rider’s ear, through the shoulder, hip, and the back of the heel. Head up, shoulders open, back tall, hips beneath the body, leg long, heel down. This alignment puts the rider’s weight directly over the horse’s centre of balance.
How long should my stirrups be for dressage?
The stirrup leather should hang to the rider’s anklebone when the leg dangles out of the iron, with the foot relaxed. Most amateur riders ride one or two holes too short for true dressage length.
Why does my lower leg keep swinging?
The most common cause is gripping with the knee, which turns the knee into a pivot point. Open the hip, lengthen the thigh, and let the calf rest naturally on the horse’s side. Riding without stirrups in walk and trot is the fastest cure.
How do I sit the trot without bouncing?
Bouncing in sitting trot is caused by tension in the lower back and hips. Conscious breathing, off-horse work on hip mobility, and short bursts of lunge work without stirrups are the standard remedies. Quality over duration — five minutes of good sitting trot beats twenty minutes of bumping.
What is the difference between dressage and jumping position?
Dressage uses a deep, vertical seat with longer stirrups and shoulder-hip-heel alignment. Jumping uses shorter stirrups, a forward seat, and a fold from the hip over the fence. Both are built on the same foundations of balance and weight in the heel.